The first Biennial Conservation Colloquium was held at the University of Illinois at Urbana-Champaign in early November of this year. Four conservators traveled to Urbana from the UK and across the country to speak about their research or practical experiences with various adhesives in library and archives conservation. This post is the second in a two-part series, in which I attempt to summarize the major points of each talk. You can read part one here.

The first topic of the afternoon was pressure sensitive tapes and adhesives, presented by Elissa O’Loughlin, Senior Conservator in the Division of Conservation and Technical Research at the Walters Art Museum. Over her 30 year career, O’Loughlin has conducted extensive research on the history of tapes, their usage in libraries and archives, and their effects on cultural heritage materials. She was awarded a Samuel H. Kress Conservation Publication Fellowship by FAIC in 2013 for her forthcoming publication, A Conservation Guide to Pressure Sensitive Tapes; History, Identification, Treatment, and continues to teach a popular tape removal course for mid-level conservators (read a review here). In her spare time, O’Loughlin also makes some amazingly useful brass tools.
“To conquer a large topic, you have to divide it and go bit by bit.”
The sheer variety of pressure sensitive tapes available on the market historically and today is overwhelming. O’Loughlin began with a discussion of nomenclature and materials, insisting “sussing out materials categories is really important”. She presented a list of three major types of tape: Rubber, Synthetic, and Other. Rubber tapes are typically packing, sealing, masking, and joining tapes, and are the workhorses of the commercial tape world. Synthetic tapes are often the tapes used for home or office, such as Scotch Magic Tape. O’Loughlin’s “Other” category included silicone, Very High Bond (VHB), or security tapes, and are not found as often on library and archives materials.
O’Loughlin displayed a large tree diagram of different carriers and adhesives of commonly available tapes and their composition. Tape carriers can be made of plastics, textiles, metal, paper, or other materials. Common plastics for carriers are cellophane, cellulose acetate, and polyester. Tape adhesives have several components, such as elastomers, plasticizers, tackifiers, dyes, fillers, and other chemicals (like surfactants and optical brighteners). Elastomers, or the “backbone” of the adhesive, can be natural rubber or synthetic. Plasticizers, or the lubrication required to get long molecules moving together (think olive oil in pasta), can be vegetable oil, mineral oil, petroleum. Tackifiers are often natural or synthetic resins. When broken down into this extensive list of components, it became clear that tapes are not as simple as they initially appear and accurate identification is important for making appropriate treatment decisions and identifying optimum storage environments. For example, weak acids are the degradation products of rubber-based adhesives, so removing the carrier and excess adhesive from a paper object’s surface isn’t really enough. Adhesive that remains embedded in the paper fibers will continue to react and can cause the paper to fall out. The quick fix for these materials is cold-storage, but not everyone has access to that kind of storage environment.
So how do you quickly identify the tape on the object in front of you? O’Loughlin provided several tables of aging characteristics and quick identifiers, which I have reproduced below:
Aging Characteristics |
|
Rubber |
Acrylics |
| – 3 Stages clearly observable – Solubility shifting – Procedes at variable rate – Strong chemically driven forces – Loss of volatiles – Color change (yellow a clear indicator) – Brief stability – Become embrittled – Usually paired with poor carrier (cellophane) |
– Aging not easily observable – Not soluble in paper-friendly solvents (boiling toluene!) – No strong chemical forces driving aging – Loss of volatiles – No significant discoloration – Have long term stability (compared to rubber) – Some carriers may deteriorate |
Quick Indicators |
|
Rubber |
Acrylics |
| – Discoloration- Brittle, yellowed carrier – Adhesive failure – Penetration of adherend by adhesive components – Significant florescence at 365 nm |
– Frosted carrier – Minimal discoloration of carrier or adhesive – Shrinkage of cellulose acetate carrier – Ooze of adhesive (soft solid at RT) |
A few other handy tips that came up during the presentation: a simple test of a plastic carrier with acetone can tell you a great deal. If the carrier dissolves, it’s likely cellulose acetate and you can quickly determine that the adhesive is synthetic. If you heat the adhesive and smell pine or tree sap, there is a resin component. If using a cotton swab and solvent to remove a rubber-based adhesive, a quick check of the swab under UV will tell you if the solvent is effective. If the swab fluoresces, you know that it is working.
A large portion of O’Loughlin’s talk was a history lesson on the development, use, and analysis of tapes from her upcoming book. She joked that if we mark eras of human culture by the materials that we use (Bronze Age, Iron Age, etc.), then the period since 1928 would be known as the “Sticky Plastic Tape Age”. O’Loughlin reports that although problems with tape aging were being described as early as 1935, expediency of function probably overshadowed any long-term faults. Compared to other available adhesives at that time, tapes did not require complicated or time-consuming methods to apply or dry: they just worked. Over the course of the talk, I learned a great deal about WPA programs for repairing library materials with tape and early testing conducted by NARA and the Library of Congress. O’Loughlin’s history was both educational and entertaining; I am really looking forward to reading the rest of her book.
Following the talk, there were a few minutes for audience questions and general discussion. Conservators hate tape. We get angry just thinking about the armies of past library volunteers, carefully covering entire objects in it. Tape that took only a few seconds to apply can take hours to reverse- or may not come off at all. Even so-called “archival tapes”, like Filmoplast, have aging and reversibility problems that have been discussed in the literature for several decades now. We have to understand that the library and archives custodians of the past were well-meaning; however, I’m reminded of that old proverb about the road to hell being paved with good intentions. The discussion was a good reminder that conservators now have so much information at our disposal. Commercially produced “archival” products can be seductive in how easy they are to purchase and apply, especially in the face of limited staffing and massive collections; however, those same products often have negative long-term implications for the object. A little research can often yield a simple repair technique, using predictable adhesives that are already available in your lab.
The final talk of the colloquium came from Gawain Weaver, a photograph conservator in private practice based in San Anselmo, CA. Weaver has worked at many prestigious institutions over the course of his career, including the Getty Museum, the Amon Carter Museum, Library and Archives Canada, the Museum of Modern Art, and the Northeast Document Conservation Center. I took Weaver’s Care and Identification of Photographs workshop back in 2010 and I regularly make use of my notes from that workshop to properly identify and make decisions about objects in the collection here at UIUC. I’ve also heard some glowing reviews of a workshop that he taught recently with Jennifer Olsen. You can read about that workshop here. Weaver’s talk was titled “Photographic Adhesives: History, Preservation, and Treatment Issues”, and mainly focused on the adhesives and techniques traditionally used to mount photographs and their reversibility. For readers that are not familiar with early photographic processes, I would recommend the new Format ID Guide of the Preservation Self-Assessment Program (currently under development at the University of Illinois), as well as Graphics Atlas. Weaver presented a tremendous amount of information in this talk. The following summary is incomplete, but will serve as a general overview.
The earliest photographic adhesives are usually water-based liquids or pastes, and include starches, mucilage, dextrin, gelatin, and alcoholic mixtures of the aforementioned. Caoutchouc (natural rubber) and commercial mountants were also sometimes used, although long-term stability can be a problem with these products. Photos from the 19th century were typically adhered overall or just at the edges, with a brush or roller application. Weaver described the mounting techniques for salt print as the most rudimentary mounting techniques; however, there are so few remaining. Often higher quality mount paper is used than some other photographic processes, and starch or casein is the adhesive typically used. In Weaver’s experience, salt prints sometimes come off the mounts with water only, but they can be pressed very hard into the mat with a roller press.
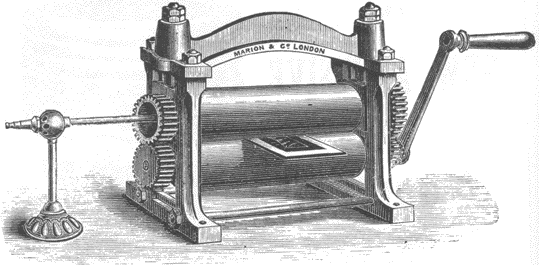
“Marion’s Self-adjusting Rolling Press & Burnisher,” 1884
Weaver reminded the audience that albumen prints curl a great deal on their own, so they are usually mounted. Albumen mounts are often a wood-fiber core with better paper laminated to the outsides. An all-over application of starch, casein, animal glue, or vegetable glue with a brush is characteristic. While a rolling press was typically used, Weaver provided some background on the development and evolution of burnishers and enamelers in the late 1800’s. These machines included rollers lubricated with wax or soap and sometimes heated, such as the one pictured above. He described the evolution of this equipment and its affect on the glossiness of photographs, stating albumen prints from the 1890’s can be almost unrecognizable. Obviously, all this pressing and burnishing can make albumen prints very difficult to remove from the mount.
Weaver described changes in mounting techniques at the turn of the century, such as using dots or lines of adhesive instead of over-all application. Mounting along the top edge becomes more common for photographic prints that don’t tend to curl as much, like gelatin prints, platinum prints, or gravures. Rubber cement was more common as a mounting adhesive, starting in the 1920’s and 1930’s. Weaver stated that literature from the period includes discussion of the staining and non-permanence of rubber cement. Much like pressure sensitive tape, it seems convenience won out over issues of permanence.
In the 19th century, dry mounting really just meant water soluble adhesives, just with a drier application. Dry mounting tissues, or tissue dipped in shellac, were adopted from the hat-making industry and more widely used to mount photographs and prints after 1900. Weaver observed that Kodak continued to make a shellac-based tissue until the 1970’s, so it is quite common. He stated that use of these mounting tissues declined after the 1970, due to the rise in popularity of Resin Coated (RC) papers. Modern dry mounting adhesives are typically a PVA/ethylene mix. For a better history of dry mounting processes, Weaver recommended Watkins’ article “Origins and Development of Dry Mounting” (1993).
Weaver spoke at length of different techniques for adhesive and mount removal. Photos from the 19th century are often removable with simple humidification. These prints can be soaked in cold water with some risk, while soaking in warm water carries a lot more risk. If the mount can be sacrificed, mechanical backing removal and application of a poultice may be effective. Animal glue stuck on gelatin emulsion is nearly impossible to remove, as gelatin swells more readily than the animal glue. Hot air pencils, heated spatulas, or heat guns can be useful tools for the removal of dry mount adhesives, but Weaver recommends models with digital temperature controls. Dry mounting tissues can also be reversed effectively with solvents such as acetone (for older tissues) or naptha (for newer tissues) in a polyester envelope with a blotter soaked in solvent or a solvent chamber; however, problems can easily occur.
As expected, Weaver issued frequent warnings of the risks of treatment throughout this part of the discussion. Each process has its own sensitivities and extensive testing is required to make appropriate decisions. Coatings (like pyroxylin) and finishes (like Ferrotyping) can be quickly and irreversibly changed during treatment. Similarly, albumen can easily crack. Some of these warnings were quite dramatic. After describing the removal of rubber cement staining using an acetone bath, Weaver showed a rather terrifying video of a matte collodion print in acetone. The image completely evaporated in around 12 minutes. In his experience, testing can be very misleading for individuals that are not intimately familiar with historic photographic processes and materials. For example, coatings on the image can make a solvent appear safe in testing when it will be detrimental in a solvent chamber or bath. According to Weaver, modern color processes, such as Dye coupler prints, are very complex and should be left to a professional with extensive experience. Because formulas from the manufacturers change so rapidly, and very little research has been done, it can be very difficult to determine which treatment techniques are safe.
Weaver’s talk was a good refresher on some of the materials and adhesives used to produce mounted photographs since the 19th century. Many of the adhesives and application techniques historically used, as well as the techniques for their treatment and removal, are familiar to book and paper conservators. Some of Weaver’s examples were also solid reminders that photographs are complex objects and treatment should not be approached casually.

Terrific encapsulation of this workshop. Rachel went, and brought back a lot of information. Sounds like it was really useful.
Thanks, Beth! It really was a fantastic event- a very inspiring group of people and their talks complemented each other well. It’s really all thanks to Cher Schneider: she pretty much put the entire thing together. I’m already looking forward to then next one:)
Thanks for such a detailed write-up of these talks! I wish I could have gone!
Thanks, Suzy! Yes, we missed having you here. See you at the next one??